Thursday, January 31, 2013

The Perspective Taking Table


I have to say a HUGE thank you to Mark Bachle for making my dream of the perspective taking table come true! I have a feeling it’s going to go down in daycare history as the coolest toy ever. Mark is also working on some other parts to transform our 15.00 train table into about ten different things including a much bigger light table. I am SO grateful to him for all the time, energy and craftsmanship he put into creating this project. Best of all, most of the materials Mark used were recycled or repurposed in some way. I’m super excited to see what we can imagine with this beautiful piece of furniture. 


The perspective taking table

The perspective taking table is an idea I started kicking around about a year ago after taking a photography class at the local camera shop. It's simply a Plexiglas table top that allows the children to see things from varying perspectives depending on how they move around as they work. The interest in combining movement withbuilding and an added visual dimension was sparked by an activity our instructor encouraged us to try. He challenged us to consider changing our perspective simply by moving our feet, bending our knees and considering the subject from a variety of different angles. He went on to discuss how the simple act of adjusting our vantage point while shooting the same object could yield dramatically different photos. I was struck by how simple and profound it all was. Then I kicked myself for not figuring that out on my own. Here I was shooting all my photos for the last twenty years from the same perspective; head on, subject right smack dab in the center of the frame. Mostly I would get the same shot with a different face - it was all very boring. Every so often I would get something fantastic (shot from a different perspective no doubt) but I lacked the presence of mind to consider what it was that made the photo special. 

Learning to change my perspective while shooting opened my whole world up, both literally and figuratively. It gave me a pause button to freeze action from alternate perspectives. Eventually I applied this concept to my observations of the children and I made a conscious effort to change my position often while shooting their work. The end result was that I saw all sorts of things I had missed during the “hands on” part of working with the children because I was too busy interacting with them. My new shooting style became a great tool for me to see all of the things I missed while facilitating our lessons. As I reviewed photos of the children at work I noticed areas of interest hidden in plain view; children experimenting with things in ways I hadn’t noticed before or they added materials to our projects that changed the direction of their work. Those observations became the building blocks of our subsequent projects.

This simple shift in thinking got me to wondering how I could expand the children’s thinking by encouraging them to consider “perspective” as the springboard for innovative thinking. I wondered how much more they would see by examining their work from unusual vantage points. Would their designs and structures become more complex if they could see them from beneath? Would their understanding of light, shadow, movement and three dimensional shapes evolve? How much longer would they experiment with building materials if they had the added visual interest of a novel building surface? After some thinking and experimenting with Plexiglas our perspective taking table was born.    

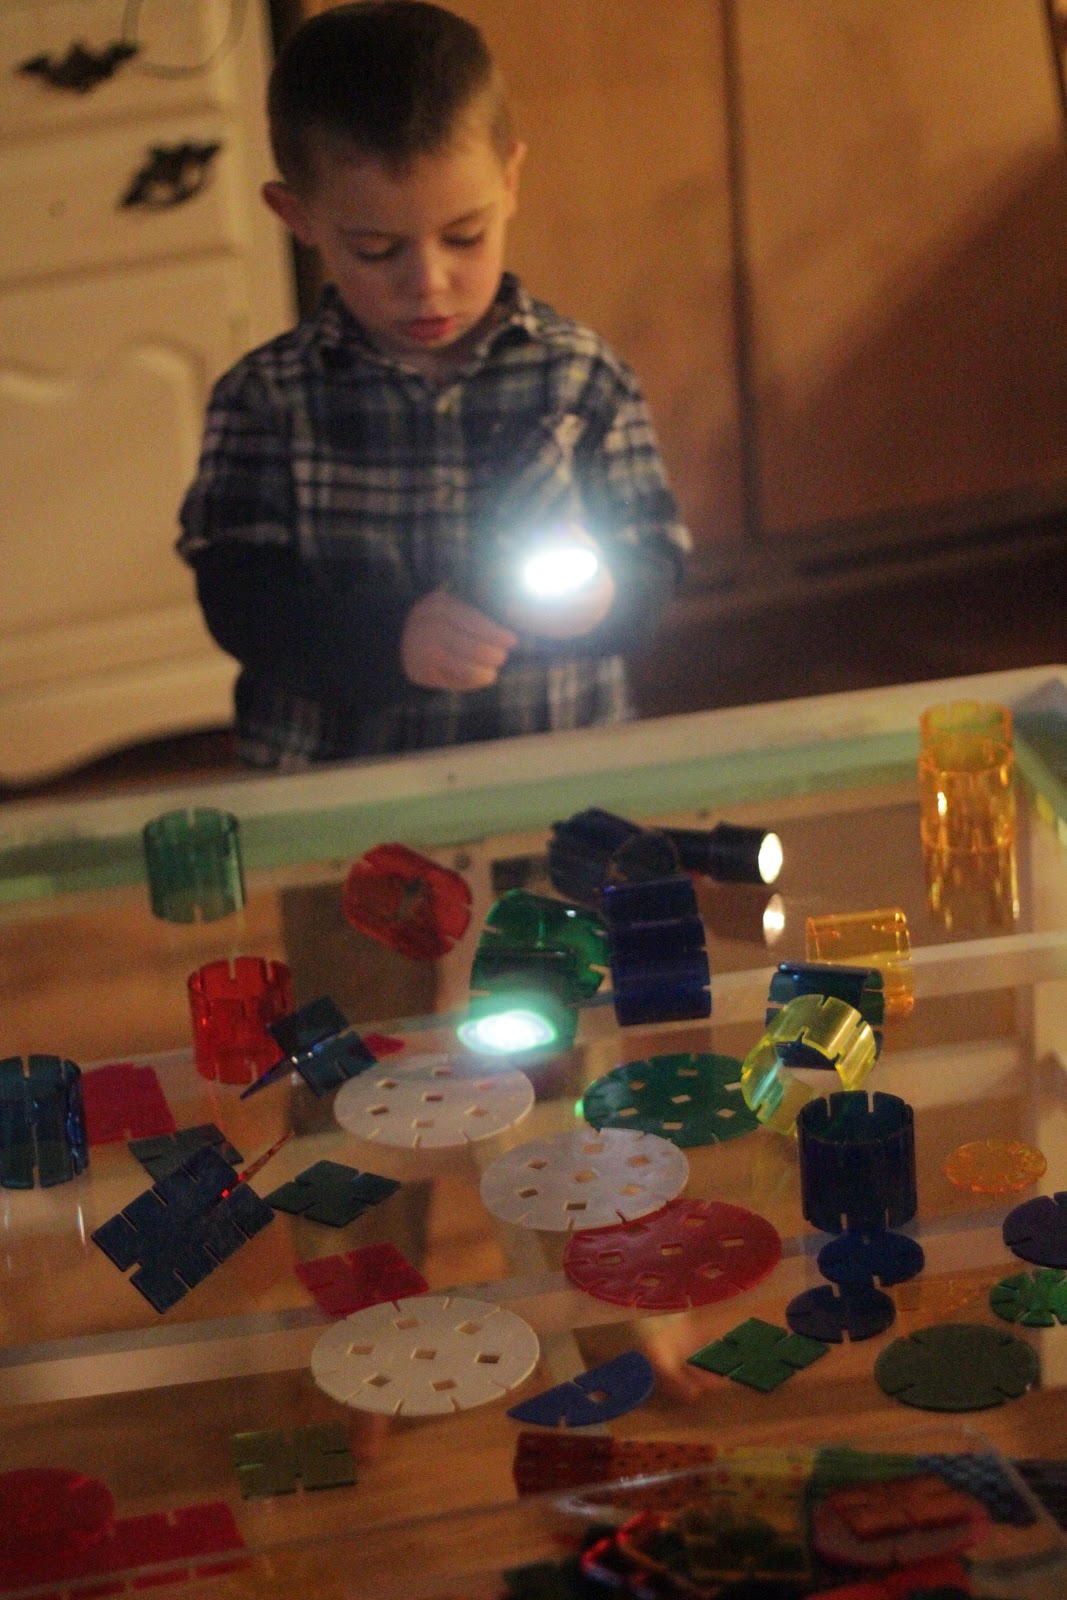
The lovely thing about changing perspectives is that it facilitates cognitive flexibility and creative thinking. These are not skills that are specifically targeted in early childhood or even later on in school aged children but I believe that shaping those patterns of thinking could profoundly change the lens through which children see the world. Our perspective taking table allows the children to examine their structures with the added dimensions of height, distance and depth from various angles. It also allows light to filter through the walls of their structures illuminating the perimeter and casting colorful shadows in various directions. I have to imagine all that beauty could convince just about anyone to fall in love with math, science and geometry!


Wednesday, January 30, 2013

Sit N Spin art


Materials

sit n spin, masking tape, markers, crayons, large sheet of paper, cars / trucks

Introducing the project:

I introduced the project by saying: I wonder if there’s a way we can attach the markers to the sit N spins to create spin art?

The children got to work attaching markers with masking tape in various configurations on the sit N spin. Some placed the markers on the top of the seat horizontally, some dangled them from the top of the steering wheel and others taped markers along the sides. Most of the markers were not in a position to leave a mark so I got to work setting up the second sit N spin with markers on the sides, tips facing down so that they could see the contrast between the position of the markers on each spinner. 


Testing the sit N spins: We set both sit N spins on a large sheet of paper to test them. The children very quickly realized that one of the sit N spins were leaving circles on the paper while the other was not. I asked them if they noticed anything different between the two spinners. At first they couldn’t figure out what the problem was. They took turns spinning on the sit N spins and they tried moving them to different areas see if that would make a difference. After some time, I asked the kids to get off the sit N spins and asked them to watch as the platforms spun. I asked if they noticed anything different about the markers on the sit N spins.

They watched for a few minutes then got to work moving markers around the sides of the sit N spin. As they took turns getting on and off the sit N spins they had to reposition the tape and markers so that the tips were face down. Later Will decided to apply the same concept to attaching markers to trucks. The idea caught on and pretty soon everyone abandoned the sit N spins for the freedom of movement with the trucks.


“Ms. Geraldine don’t worry I can fix this” - Sam when his marker did not leave a mark of the paper. He repositioned it and kept on driving across the paper watching to see the skippy line left behind the paper. As Sam neared the edge of his paper he positioned his marker so that it was pointed up in the air and showed me that he could drive on the wood floor without leaving a mark.

Meanwhile Addie devoted most of her time working on figuring out how to manipulate the sticky tape without twisting it up. She spent the better part of an hour making her way through the cycle of picking the edge of the tape off the roll, slowly peeling back the desired length, attaching it to the table and cutting the dangling ring so that it clonked on the floor. When she was successful, she was rewarded with a single strip of tape to add to her sit N spin tape collage. More often than not, she was unsuccessful and the tape folded in on itself or twisted up as she worked rendering the entire process useless. Addie didn’t mind; she just smoothed her hair out of her eyes, wadded the sticky mess up and tossed it in the trash in a matter of fact way. Then she cheerfully went about starting the whole process over again.

Logan’s focus was on studying the lines behind various vehicles. His favorite seemed to be a truck left a long skippy line that he enjoyed watching over the circular lines of the sit N spin and the solid lines left behind the other trucks. He experimented with adding a marker to a truck and one to a trailer then attached the two together. He was excited to share with us that it left two lines - one skippy and one solid. Logan also initiated a game of following the leader with the cars over lines made by the sit N spin.

As Jackson worked he discovered that if he lifted the markers while he spun they would leave no mark and if he pushed them back into position they would resume leaving huge circles on his paper. He worked with Addie at the taping part of the project, asking for help or offering it to her when the tape became tangled. While Addie worked he held the top of her tape to keep it from slipping off the table. Later Jackson asked Addie to help him work his scissors when they kept sticking to the tape. 

Will initiated the idea of taping markers to trucks. He also experimented with placing tape over the entire body of matchbox cars and noticing that they didn’t roll very well with the wheels covered. He experimented with shifting the angles of markers and dangling them off the back of his truck after watching Sam’s success with that method on his truck.

Carmen was happy to watch. We offered her several turns on the sit N spin but she seemed very unsure of the paper colored floor. She opted instead to watch through the camera screed on my lap. She also had a great time playing her own game of collecting / dumping matchbox cars and rocks in various containers.  

Throughout our play the children learned to wait for a turns with coveted toys and to help each other out. They watched their friends work with materials and used those ideas to adapt their own projects so that they could be successful. They worked together and helped each other manage the sticky tape.


Tuesday, January 22, 2013

Indoor Winter Wonderland


Our winter weather is so bitter cold we will likely be forced to stay inside for the next few days. I am pretty die hard when it comes to getting out to run and enjoy the sun but at - 20 degrees it’s just not safe for little people to be out. On really nasty winter days, we turn out indoor space into a maze of fun gross motor activities to keep the wee ones from going stir crazy. My kiddies need at LEAST an hour of physical activity so part of the fun was using their bodies to move heavy things while setting up. 

First we had to clean up ALL the items they had laying on the floor and tuck a few things away to make space for running inside.

We took out the slide, some scooters and set up a ball tossing game with targets.


We also had our trusty jumping spot for little ones needing to jump or wrestle. 
Later we turned our table into a little fort where the children burned off lots of energy gathering pillows, rearranging the sheet and hanging from the cross bars.


After all that moving about we played some music and soaked our hands in warm soapy water or pounded playdough to calm down again.  


Friday, January 18, 2013

Stamping Words


We have all been busy at work in the various stages of letter recognition, letter sounds and reading. Most of the two year olds are able to identify the uppercase letters with some regularity and they can recognize the names of the other children in the class. (There is always a big ta do at mealtime if somebody is sitting in a chair with the wrong name on it! ) The goal of this literacy project is to refine the skills of identifying the letters / sounds of familiar words and working with the letter stamps.


The set up: 

On one side of the easel I taped simple flash card words with space for Sam to stamp the corresponding letters underneath.

The other side of the easel had papers with each individual child’s name stamped on them.

Our small table had stamps, stamp pads extra paper and extra paper for open ended stamping.

Time to get to work!

At breakfast Sam read all of the flashcards on the easel and I explained that he could copy the letters underneath if he wanted to. He made it through two before deciding to do his own thing so we will leave it up for him to revisit another day. 

The younger children took turns identifying all of the names and we worked our way through the letters / sounds in their names. We talked about the beginning letter sounds of each name and I showed them space at the bottom of their names if they wanted to copy them. As they worked many of the children opted to “write” words by stamping random letters in sequence then showing me their word. Some of the children brought me letters to refresh their memory while others spent a long time searching for specific letters and discussing the sounds of those letters. When we were all finished they helped me match the letters to the correct spaces in the letter stamp holder. That was a tricky task in and of itself!


While the kids were working I made them these name stickers for art projects.

The skills needed to read and write involve many different parts of the body and brain. Working on hands on projects like this gives children the opportunity to extend what they know without over reaching their fine motor capabilities. The children learned the following concepts during their project today:

Letter matching
Print has meaning
Letter identification / letter sounds
Working together with peers to solve problems
Sequence of stamping on the pad then on the paper


Wednesday, January 16, 2013

Making it up as we go Along


I used to think that a big part of being a really great teacher was having a stellar lesson plan that encompassed all the key areas of development. In my imagination, the really great teachers diligently wrote and followed their lesson plans every week. The children who were lucky enough to bask in the glory of these magnificent minds, were so riveted by their flawless masterpieces that they flourished and everyone lived brilliantly ever after. 

According to my own limited definition I have never been able to reach the status of a “really great” teacher, in fact I’m pretty sure I never will. I seem to have been born missing the the magical component that endows “really great” teachers with the capacity to write and stick to lesson plans regularly. Sure I can compose a beautiful lesson plan; I can even recite all the ways in which my open ended activities will influence a child’s development but when it comes down to the follow through part, my toddler - like attention span just won’t let me do it. I get distracted or bored or completely absorbed in something totally unrelated to my original plan.

Somewhere along the way I’ve decided to make peace with my shortcomings and accept the fact that I’m only capable of (gulp) teaching on the fly. As unconventional as it is, my etch a sketch memory gives me an almost superhuman ability to shift my thinking on a dime - turns out that skill comes in quite handy when working with curious little minds. I know full well that some people might not consider teaching on the fly to be a valid method of teaching, afterall there is no formal plan written ahead of time, no predetermined destination to reach. There’s just a bunch of toys, some curious kids and a leap of faith that something cool is going to happen. What can I say? We've all got to work within our skill set and I am no exception to the rule. 

One thing I do know is that teaching on the fly always yields lessons that are relevant to the children’s interests. They are always deeply emersed in whatever it is we do, even if we don't know what we'll be doing until we're actually doing it. I also know it's a magical thing to witness.

Lately the kids have been bringing in all sorts of cool toys from home to share with the group. Our projects tend to be cobbled together from items they lay on the table before the group and random bits gathered from around our room. I keep a few backup projects on standby just in case the kids haven’t conjured up a brilliant plan by mid morning but rarely do they fail to imagine something awesome. 

Our most recent collection of items to investigate were an accordion, five mini monster trucks, a remote control monster truck, some primary colored handprints and crayon rings.


The children determined that our first task should be to figure out how the accordion works so we googled videos on the inner workings of accordions. We learned that there are reeds in the accordian and that air moves through it like a harmonica to make sounds. We also watched some pop song accordion music videos and danced to cheezy polka songs, then we took turns making our own music. 

The children explored the parts of an accordion and compared the similarities between the keys on an accordion and the keys on a piano. 

The following are some of their responses to the question: “What did you learn about accordions today?”

“They go open and closed.” Jackson

“It changes the sounds when you push the buttons.” Will

“I had fun with it and it was hard to hold. ” - Sam

“I put the accordion (straps) on my arms and open and close.” - Addie

“You can put on the straps on your body and move with the accordion, and you can push the buttons to change the sound.” - Logan


Later we made up a color sorting game with some handprints that Carmen brought in. The children waited patiently for a turn to use tweezers to match colored tiles to the corresponding handprints on the lazy susan. We also used the very same colors of crayon rings to cover a large sheet of paper in a group project.


Then we built some really cool things on the train table for our monster trucks to crash and smash. There were ramps made of scrap wood and lines of “old broken cars” for the monster trucks to roll over - just like the videos we googled the during a discussion about Sam’s birthday trip to the truck pull.


We learned about how the wire in the remote control on the monster truck sends a message to the vehicle so that it knows which direction to move in. We also discussed the importance of handling the truck with care so that the wires didn’t become detached and unable to communicate. We took turns building walls together and laughed hysterically as the monster truck crashed them down. 


Tuesday, January 8, 2013

Snow Science II: Studying the consistency of paint


Materials:
Leftover melted snow paint, fresh tempera paint, blowdryer, droppers / spoons, sensory bin and paint tray

Setup:
I set up the paint station with two cups of melted snow paint (from yesterday’s experiment) and two cups of fresh tempera paint near the sensory bin. I set the blowdryer nearby so the children could have access to it as needed throughout the project.

Explore!
We reviewed our snow project from yesterday and discussed how we had used the blowdryer to transform the melted snow into colored water. As the children watched, I poured new tempera paint in smaller containers for them to explore. While they explored the paint, we discussed the consistency of both kinds of paint. 

They mixed, poured and stirred paint in containers noticing that that the new paint was “gloppy” and dripped slowly from the spoons while the snow paint was very watery and ran right off the spoon.

Some of the children clearly enjoyed the thicker paint much more than the watery paint. They scooped out lots of paint into a great gloppy mass, flinging it and splattering it on their tagboard before taking a turn with the blowdryer. 


Others preferred the unpredictable nature of the watery snow paint. They seemed to enjoy the challenge of scooping up enough paint with tiny spoons then carefully carrying it over to their project trying not to spill. Often the paint ran onto the floor before the artist reached her destination - despite their best efforts. Eventually we decided to add eye droppers to the paint cups which worked out MUCH better. 

After some exploration, the children added a twist of their own to our little experiment by mixing the different consistencies of blue to make paint that was neither too thick nor to thin. They used both the eye droppers and the scoopers to cover their paper in the medium textured paint then turned the blowdryer on it. 


As each child covered their paper with the desired amount of paint, they all took turns using with the blowdryer to move the paint around the paper. We observed the changes in the textures and colors of the paint as they changed positions with the dryer. The thicker paint moved slowly in flat waves while the thinner snow paint blew across the paper in fast little rivers. Towards the end of our experiment one child dumped ALL the pant on his paper and blew it all around the sensory bin. He seemed to take great pleasure in watching the movement of the colored water waves as they rolled across the bottom of the bin, covering his paper completely. 

Monday, January 7, 2013

Snow Science


Playing in the snow is lots of fun but it’s tricky for little people to build with puffy snow gloves and numb fingers. Our solution for cool creative fun - bring snow indoors! 
By adding paint, a few fun kitchen gadgets and our imaginations we were able to come up with three fun snow activities.


Snow paint

First we explored painting on snow with the following materials: Watered down tempra paint, Paint brushes, Trays of snow.
The kids built “tunnels for bad guys” with their paintbrushes, they tried covering all the snow in paint and they observed color changes as they dropped different colors of paint on painted snow. They also watched the colors change from brilliant yellow to muddy green as they dropped heaping scoops of blue snow in paint cups.

Working with the snow, paint and water provided the perfect platform for illustrating the vocabulary words “dissolve”, “melt”, “disappear” and “transform”.


Sensory Bin
Some children enjoyed cooking and building in the sensory bin. They used dishes to mold the snow into various kinds of food and houses. As we worked we talked about the process of snow melting when the sun comes out . 

Some of the children wanted to take their snow creations home, I asked if they thought the snow creations would last until their moms came. During the course of our conversation I found it interesting the children knew that the snow would melt outside but did not think they would melt inside. Maybe because they knew the sun was responsible for melting the snow? I didn’t correct them but suggested that we put the painted snow in a clear container for easier transport. 


Melting Snow
As they went about the business of playing and cleaning up, they started to notice the snow was becoming liquid. One by one they came to the table to look at the jars. They had fun shaking the jars and turning them upside down to see the colored liquid move back and forth. We again talked about how the snow is turning into colored water even though it was not outside. We talked about how cold the jars were. During their observations it became obvious that the jars the children shook became more liquid. Josh asked the children what would happen if we added a blowdryer to the snow, they didn’t have any ideas so we tested it. 

The children squealed with delight as they took turns warming the jars up with the blowdryer. While they waited they continued to shake the jars and tip them back and forth. When they were all finished taking turns, Josh took a hunk of snow out of the jar and completely dissolved it so that the tray was full of water.